Stories And Secrets
The implication of the saying "a picture is worth a thousand words" is what makes photography so powerful. Yet, no matter how informative and complete in itself as a work of art a picture might be, when I look at a photograph I'm curious about the photographer's story: Why those specific locales/subjects? What techniques and/or methods were used? When, where, and how does inspiration arise? How can I find out more about the subjects of the photos?
I offer this blog as a way to answer these and other questions about my photographic images. Please comment and/or contact me with your responses and questions stimulated by my posts.
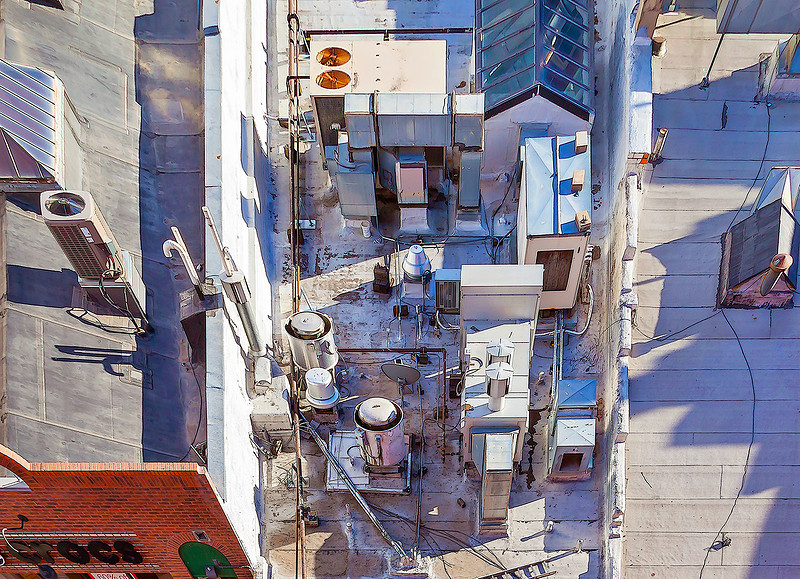 Rooftop Structures, detailShadow, shape, and surface texture are very evident in this detailed view, and are what initially drew me to this subject. Notice some shape distortion, especially near the right and left edges of the image, as a result of the process described below. Rooftop Structures, detailShadow, shape, and surface texture are very evident in this detailed view, and are what initially drew me to this subject. Notice some shape distortion, especially near the right and left edges of the image, as a result of the process described below.
Random Utilitarian Objects
When I first spotted this view, looking down from the nearby parking structure onto the back end of the Flanders Brewing Company on Boulder's Pearl St. Mall, I was fascinated with the details of the myriad of mechanical objects and forms on the roof—most with which I was not familiar—and the shadows that they cast. I find such chance views of utilitarian objects—which aren't designed to be seen—to be more visually interesting than the more “aesthetically pleasing” intentionally designed public facades of such buildings. This idea is, in fact, at the heart of most of my urban photographs. I took several photos of this rooftop, becoming intrigued by the form and depth of the rooftop objects, the angled light falling across them, and the resulting shadows.
Rules That We All Obey
I became aware of the visual potential of this rooftop scene as I examined my photos of it. This is a one-point perspective view. As you may know, there are properties and rules that dictate how we interpret the space and objects around us. They enable us to navigate safely in the world. We couldn't walk, ride a bike, or drive a car safely if our minds failed to very accurately use visual cues like size, depth, and proximity to avoid colliding with objects or falling off edges. Our biology helps us with binocular vision, which I discussed in a previous blog. Another way we perceive depth and distance is as a result of linear perspective. This “law” states that all parallel lines or edges in a scene that recede from view appear to converge, eventually meeting at an imaginary vanishing point, usually on the horizon. Because our eyes and minds know this law, we judge distance by the type and degree of convergence of parallel lines (in a natural setting this is less obvious, but still present). All scenes contain one, two, or three-point perspective, or a combination. The photograph below is a classic illustration of one-point perspective.
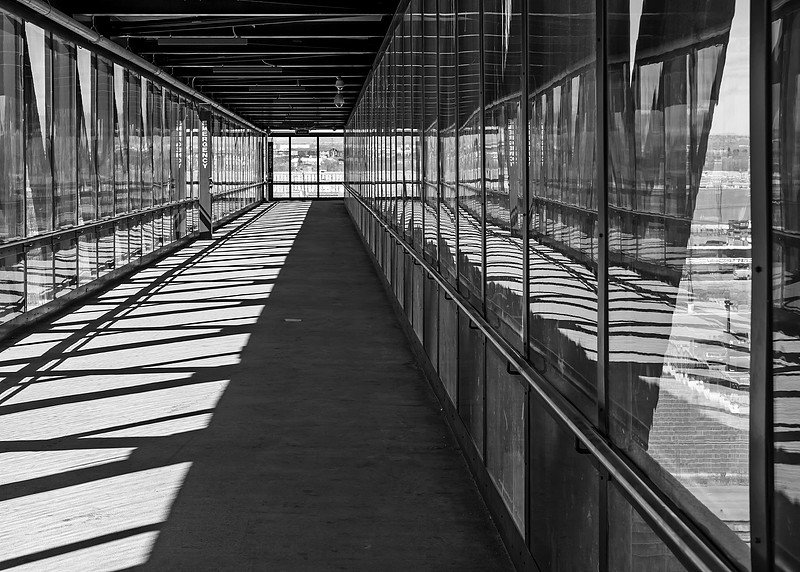 Sunlight and ReflectionAll parallel lines moving away from the viewer converge, meeting at an imaginary vanishing point. Here it is in the upper right area of the rectangular window at the far end of the corridor. If parallel lines don't move away from the viewer, such as the horizontal girders crossing the ceiling, or the vertical window dividers along both sides, they appear parallel, as they physically are. This is a one point perspective view, because only one of three dimensions recedes from the viewer (and thus visually converges). Sunlight and ReflectionAll parallel lines moving away from the viewer converge, meeting at an imaginary vanishing point. Here it is in the upper right area of the rectangular window at the far end of the corridor. If parallel lines don't move away from the viewer, such as the horizontal girders crossing the ceiling, or the vertical window dividers along both sides, they appear parallel, as they physically are. This is a one point perspective view, because only one of three dimensions recedes from the viewer (and thus visually converges).
What If Those Lines Didn't Converge?
In the real world, if parallel lines didn't converge as they receded from view we would be confused and disoriented, experiencing a type of surreal vertigo, not able to function because we wouldn't know where we are in relation to our surroundings. But what if you tried tweaking the perspective of a photograph? The photo below of the Flanders Brewing Company seemed like a good candidate due to its strong one-point perspective. I immediately began to explore ways to enhance the birds-eye viewpoint, as if I could take off and float above it. Also, I liked the strong compositional structure of the side walls of the central roof as they receded into the distance, forming borders for the very interesting shapes within them on the rooftop. I asked myself “What if those edges didn't converge as they receded? What if I could make them visually parallel (as they are physically)? How would it affect the image?” Fortunately Adobe Photoshop provides tools and filters with which to do just that.
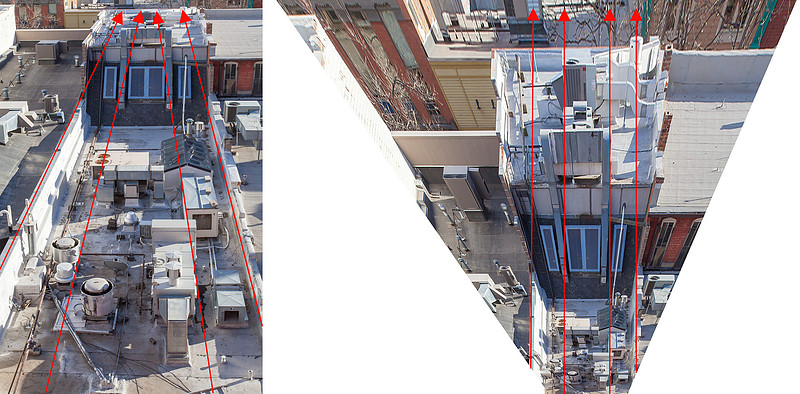 Rooftopo Structures- original & distortedLEFT: Notice that all parallel receding edges converge as they move into the distance visually (indicated by the red arrows). They will eventually meet at an imaginary vanishing point.
RIGHT: The entire image has been distorted in Photoshop so that these same parallel edges are now pretty close to visually parallel (red arrows). To do this the top of the image had to be stretched apart in relation to the bottom, distorting all dimensions drastically. Rooftopo Structures- original & distortedLEFT: Notice that all parallel receding edges converge as they move into the distance visually (indicated by the red arrows). They will eventually meet at an imaginary vanishing point.
RIGHT: The entire image has been distorted in Photoshop so that these same parallel edges are now pretty close to visually parallel (red arrows). To do this the top of the image had to be stretched apart in relation to the bottom, distorting all dimensions drastically.
Controlled Distortion
What I discovered upon distorting the original photo to the point of making the receding, converging edges of the roof parallel were several inconvenient facts. First, the resulting trapezoidal shape of the picture would be difficult to print and/or frame. I could solve that by cropping the image to a rectangle. Second, because I had to apply such an extreme distortion to get those edges parallel, the entire photo got distorted in terms of proportion, shape, and even resolution (you can expand pixels only so much before there isn't enough pixel information to keep it sharp). So I stretched the resulting image vertically to reduce the primarily horizontal distortion, and fortunately I had shot a high enough resolution image to have some margin for lost resolution. The final issue was that the shapes in the distance that were the most distorted (the one story second level that is seen at the top of the image) became huge in comparison to the foreground shapes (in the alley at the bottom). I decided that I liked this—in fact it seemed to enhance the effect of not knowing exactly where you are as the viewer, lending a sort of fantastic quality to the image, and it fit well within the shape of that upper half of the image.
Final Touches
The final image includes parts of the alley that were not in the original. Before distorting the whole thing, I spliced this area, from another photo of the scene, onto the bottom to add some foreground context. I did some final editing, such as slight cropping, and color, tone and contrast adjustments, which I often do with pictures that include sunlight and shadows, as a way of enhancing the special quality of light that we experience in Colorado. I was satisfied with the resulting focus on the fascinating shapes that, because of their rooftop location, most of us don't often see. And I liked the late afternoon shadows falling across the scene. It's not always evident when you start out what you are going to get with an experiment like this, and I have tried some that didn't go anywhere. But whether they work or not, the process is a part of why I love photography, and the digital tools available to push its boundaries.
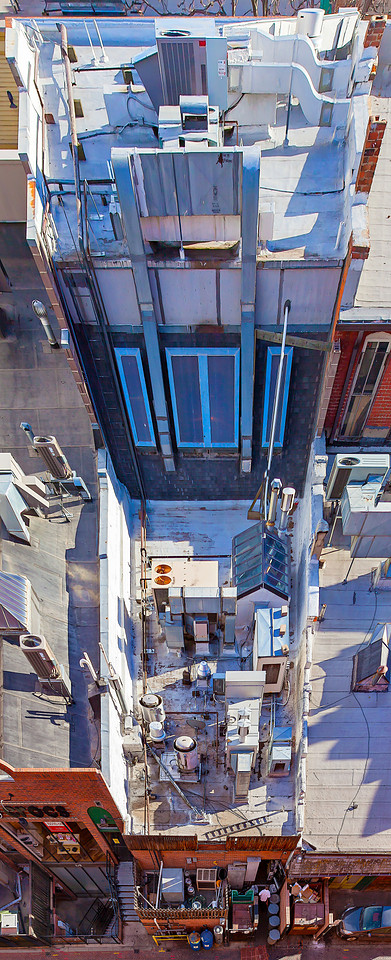 Rooftop StructuresIn the process of making one dimension of converging lines parallel in this image, the exact opposite happened, inadvertently, to another dimension of parallel edges. The once near-parallel vertical dimension (sides of the buildings and vertical structures) now converges to a vanishing point somewhere near the bottom of the image, and thus appears to strongly recede from the viewer, creating the illusion that we are hovering above the scene, whereas this wasn't true in the original photo--perhaps proof that, even with the captured reality of a two-dimensional photograph, you can't escape Newton's Third Law of Physics: “For every action there is an equal and opposite reaction.” Rooftop StructuresIn the process of making one dimension of converging lines parallel in this image, the exact opposite happened, inadvertently, to another dimension of parallel edges. The once near-parallel vertical dimension (sides of the buildings and vertical structures) now converges to a vanishing point somewhere near the bottom of the image, and thus appears to strongly recede from the viewer, creating the illusion that we are hovering above the scene, whereas this wasn't true in the original photo--perhaps proof that, even with the captured reality of a two-dimensional photograph, you can't escape Newton's Third Law of Physics: “For every action there is an equal and opposite reaction.”
Awe-Inspiring, Sheer-Sided Depths
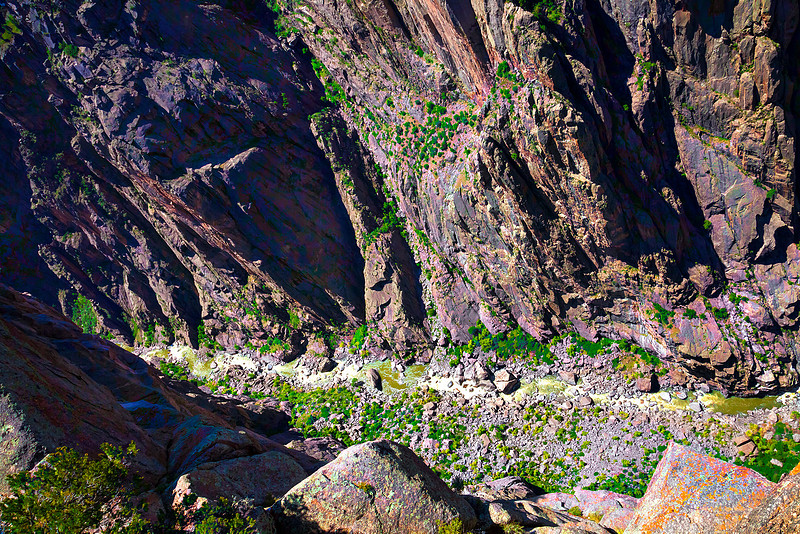
Perhaps the most awesome—and obscure—gorge in North America was formed as the Gunnison River carved through nearly 2 billion year old Precambrian rock over the last 2 million years to form the Black Canyon of the Gunnison in western Colorado, the centerpiece of its namesake national park. Geologist Wallace R. Hansen summed up its character nicely:
Several western canyons exceed the Black Canyon in overall size. Some are longer, some are deeper, some are narrower, and a few have walls as steep. But no other canyon in North America combines the depth, narrowness, sheerness, and somber countenance of the Black Canyon of the Gunnison.
Having stood on the brinks of such iconic and breathtaking chasms as the Grand Canyon, Hells Canyon, the New River Gorge, and the Columbia Gorge, I wasn't quite prepared for the magnitude of the physical sensation I had upon first encountering this abyss. I had to literally step back and take a breath or two to adjust to the terror induced by peering into the gaping void. My wife Maxine and two-year old daughter Ali were with me as we stood at the Chasm View lookout on the North Rim. In spite of the sturdy three-foot fence at this point I don't think I ever released my firm—if clammy—grip on Ali's hand during the 15 minutes we explored the rim.
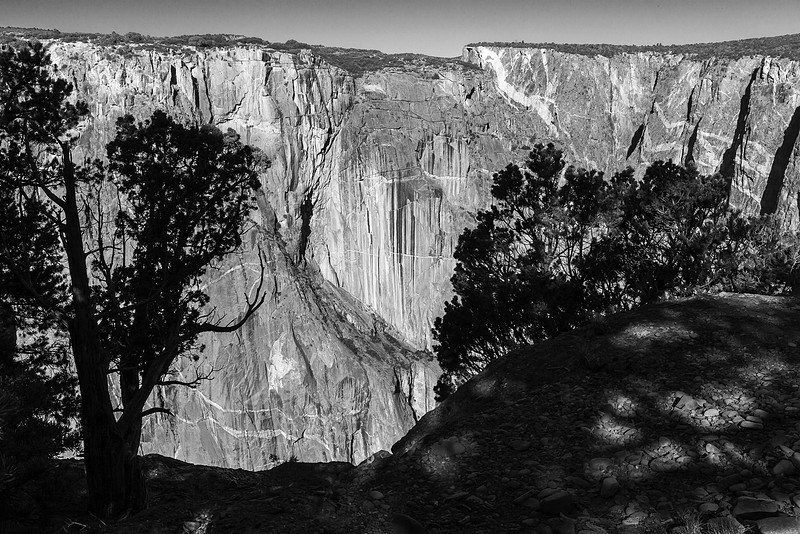 Sunrise on South WallLooking across the canyon, deeper than it is wide at this point, to the face of the south rim of the Black Canyon. On a typical late spring/early summer day one can pick out the ant-like forms of rock climbers inching their way up these sheer cliffs. Sunrise on South WallLooking across the canyon, deeper than it is wide at this point, to the face of the south rim of the Black Canyon. On a typical late spring/early summer day one can pick out the ant-like forms of rock climbers inching their way up these sheer cliffs.
Climber's Paradise
Over the years I have returned regularly to the Black Canyon. I've come to the opinion that it is Colorado's foremost natural feature. Not only is it an exhilarating place to explore and take pictures, but due to its relative isolation it receives very few visitors compared to most national parks, and offers unrivaled opportunities for solitude and serenity, especially the less-visited North Rim.
This is a rock climber's paradise. I often wake up in my tent at the North Rim Campground to the jingle of climbing hardware as a party sets out to explore and descend the 2000 foot sheer walls below. There are numerous technical routes on these vertical cliffs rated from 5.9 up to 5.13. Though I've never tried one of those, I did once attempt a foray down into the canyon on a very rocky and torturous trail clinging tenuously to a knee-achingly steep ravine. My trek ended at an impassable thicket of poison oak about halfway down; I could not find a way through, and wasn't about to subject myself to the known horrors of a case of poison oak! There are plenty of challenging trails on the canyon rims for exploring and taking pictures.
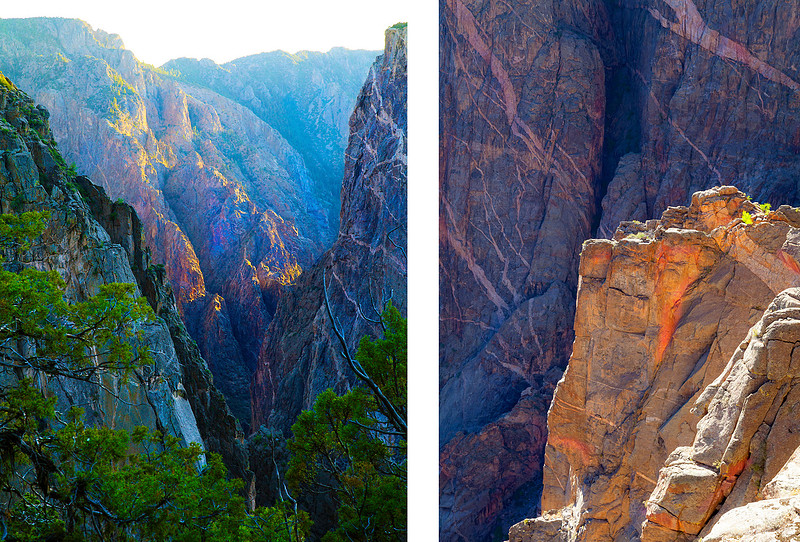 LEFT: Sunset in Black Canyon; RIGHT: Canyon InterludeLEFT: The last rays of the setting sun illuminate colorful granite crags in the canyon below the Painted Wall. RIGHT: Sunlight illuminates and reflects onto a rock outcropping, contrasting with the streaked Painted Wall in the background shadows. LEFT: Sunset in Black Canyon; RIGHT: Canyon InterludeLEFT: The last rays of the setting sun illuminate colorful granite crags in the canyon below the Painted Wall. RIGHT: Sunlight illuminates and reflects onto a rock outcropping, contrasting with the streaked Painted Wall in the background shadows.
Photographic Methods & Techniques
I've adapted some basic techniques for shooting photos at Black Canyon. Whenever possible I use a tripod, for a couple reasons. First, I often use a small aperture setting (f-16 or smaller) for greater depth of field, and thus a slower shutter speed. Second, the deep shadows in the depths of the canyon generally don't provide enough light for a fast shutter speed. In either case, hand-holding the camera is not a reliable option for sharp focus. And, I often take evening or night photos at exposures of multiple seconds—impossible without a tripod.
There are times that it becomes too awkward and unwieldy to carry/use a tripod—like on the edge of a rock overhanging the canyon, or on a very steep slope (though some slopes allow stabilization by adjusting tripod leg lengths). In these cases I practice the art of bracing. Either I lean an elbow or shoulder against a solid object like a rock or tree as I steady the camera, or I lay on my belly or sit and brace my elbows on the ground or my knees, respectively. For the picture Into Black Canyon above, I crawled—very gingerly—to the edge of a rock perched 1800 feet above the river. It took all the self-convincing I could muster to inch my head out over the rock edge, then hang my $3000 camera (strap securely fastened around my neck) out even further to click the shutter a few times, all the while adjusting composition, focus, and shutter speed. A tripod wouldn't have worked here. I had to hold perfectly still to focus, but also because whenever I squirmed around to adjust my view I began to slide toward the canyon's edge, since the rock upon which I was positioned had a slight downhill tilt to it. I breathed a sigh of relief as I finished these shots and scampered to safety; I wouldn't necessarily recommend this procedure!
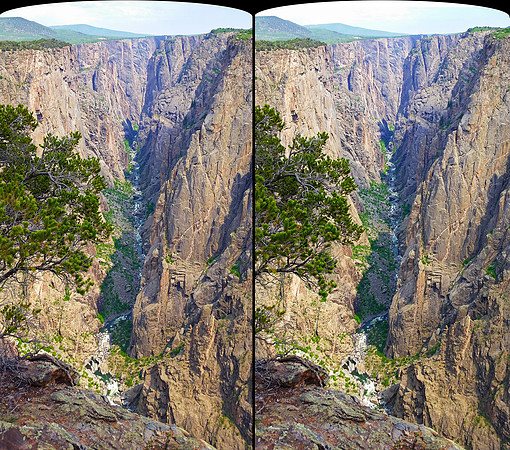 3-D photo of east Black CanyonTo see this photo in realistic 3-D depth, position yourself directly in front of the image, about 12 inches away. Use reading glasses if needed (You may need to resize your screen so that the image is no wider than 5 inches). Stare at the image, but "unfocus" your eyes, or pretend to focus on something far away, as if it were 50 feet behind your screen. As you relax your eyes you should begin to see the two panes of this image gradually becoming three panes (look for a third black arch forming in between the other two at the top). Once you clearly see three panes, refocus on the center one. It will appear in three dimensions, almost magically! 3-D photo of east Black CanyonTo see this photo in realistic 3-D depth, position yourself directly in front of the image, about 12 inches away. Use reading glasses if needed (You may need to resize your screen so that the image is no wider than 5 inches). Stare at the image, but "unfocus" your eyes, or pretend to focus on something far away, as if it were 50 feet behind your screen. As you relax your eyes you should begin to see the two panes of this image gradually becoming three panes (look for a third black arch forming in between the other two at the top). Once you clearly see three panes, refocus on the center one. It will appear in three dimensions, almost magically!
The above image is a stereo (3-D) photo. Hold your mouse over it (or, for cell phones, click it) for instructions on how to see its three-dimensional depth, or click it for instructions for how to take a 3-D photo.
I hope you enjoy my photographs. Please click here (or on the photo Into Black Canyon at the top) to view my entire portfolio of Black Canyon photos. I feel I have just scratched the surface of the photographic possibilities, and my next goal is to shoot winter scenes here.
I invite you to comment, ask questions, or relate your own experiences at the Black Canyon (Leave a Comment link at the top, or Add Comment button below). Here are some resources for more information about this surprising and stunning jewel of our National Park system:
Street Photography, Denver Style
I love venturing into an unfamiliar part of town to shoot pictures, and the excitement of discovering fresh visual possibilities. No matter how familiar I think I am by having driven through a neighborhood, walking the streets with a camera provides a more intimate and engaging experience. The sights, sounds, aromas, light, and general ambiance create a sensory experience unique to that area. The Elyria-Swansea neighborhood in north Denver was no exception, and has proven to be my favorite and most reliable location for shooting industrial images.
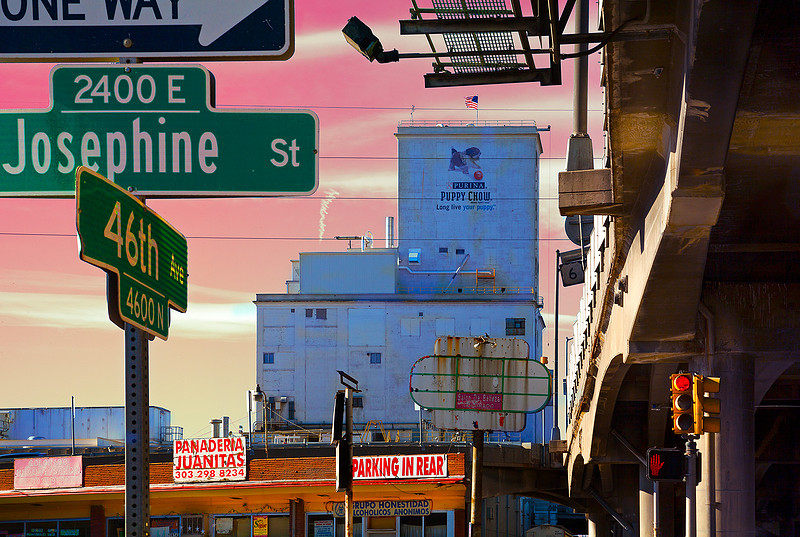 46th and JosephineI had some fun later tweeking the color in this view of a commercial strip east of the Purina Factory, with the din of I-70 overhead. 46th and JosephineI had some fun later tweeking the color in this view of a commercial strip east of the Purina Factory, with the din of I-70 overhead.
Industrial Structures Define the Public Face of Elyria-Swansea
When I first started photographing this area in the late 1990s I felt drawn to its most familiar icons, the Purina Factory and the imposing Manna Pro Feed mill. They can be seen from many locations around Denver, but particularly when passing them on I-70 en route to the airport. Upon closer examination, I was amazed at their sheer size relative to their surroundings. They evoked a sense of awe similar to that experienced when confronted with a dramatic cliff or imposing peak high in the Rockies, even putting on their own version of “alpenglow” in the late-day sun. As the most visible industrial structures in the area, they demanded to be photographed, and I have happily complied, from every angle, time of day, and season.
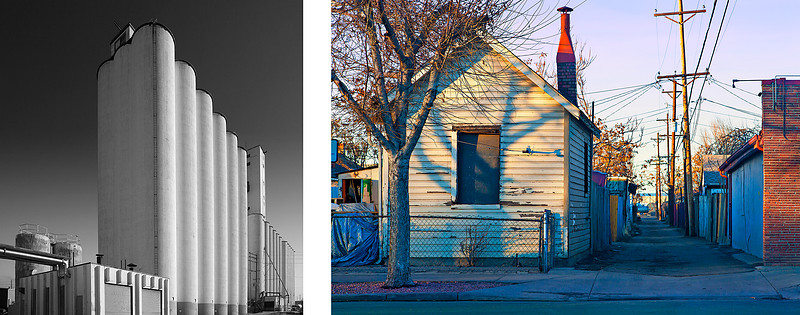 Left: Manna Pro Towers, Right: Alley ViewLeft: Manna Pro grain elevators soar above the surrounding neighborhood like an ancient temple shimmering in the sun.
Right: A typical neighborhood view as the evening sun decorates alley structures. Left: Manna Pro Towers, Right: Alley ViewLeft: Manna Pro grain elevators soar above the surrounding neighborhood like an ancient temple shimmering in the sun.
Right: A typical neighborhood view as the evening sun decorates alley structures.
Life in the Shadow of Industry
Beyond these obvious photo subjects, I discovered a vibrant neighborhood with a rich history and a strong identity. I'd learned a personal fragment of that history from my Dad. Though I grew up in western Oregon, my family had lived in Denver in the early 1950s, when my younger brother and I were born here. One of Dad's various jobs then was driving a laundry delivery truck throughout metro Denver. While visiting years later he suddenly recognized a building along 46th Avenue that—long before I-70 loomed overhead—had been a Texaco station to which he had delivered bathroom towels regularly. This sparked other reminiscences about his experiences and the people he'd known during those early years in a much different Denver.
I paid fleeting attention to my Dad's stories at the time, but they came flooding back as I began exploring the area with my camera. The years of history and the personal stories lived out here took on a tangible quality as I watched residents go about their routines and allowed myself to imagine growing up and living here, in the shadow of industry. I learned how to navigate the neighborhood, fragmented as it is by railroad tracks, interstates, factories, and the South Platte River. I learned where to be in the heat of the day to avoid being downwind of the Purina Factory. And I learned how and where the light played on the many bridges, roadways, grain elevators, and buildings at different times of day, allowing me to capture the ideally-lit view of a given locale.
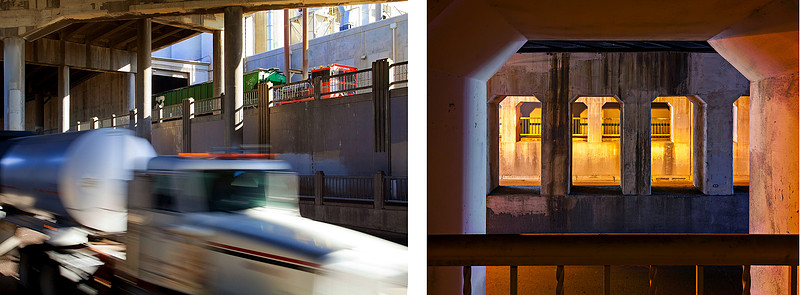 Left: 46th Ave Commerce, Right: WindowsBoth of these views were taken from 46th Avenue as it dips three levels down to thread under I-70, railroad tracks, and the Purina Factory. The rumble of trucks and aromas of industry pervade the area, but amidst all of this an alert observer can catch the visual beauty of pattern and light. Left: 46th Ave Commerce, Right: WindowsBoth of these views were taken from 46th Avenue as it dips three levels down to thread under I-70, railroad tracks, and the Purina Factory. The rumble of trucks and aromas of industry pervade the area, but amidst all of this an alert observer can catch the visual beauty of pattern and light.
Recommended Equipment and Approach
I found a tripod essential for shooting in this area. Even at midday it can be very dark three levels down in a pedestrian underpass. A two or three second exposure is often required—longer if I want to stop down my camera's aperture to achieve sharp focus throughout the image, which is generally my preference for most of my photos. With that degree of concentration on the camera and subject, I sometimes stop and realize how vulnerable I am, here or in any unfamiliar—and at times inhospitable—area of town, alone, often on a deserted street, with expensive gear and a preoccupied focus. I've been lucky; my most common “disturbance” is curious onlookers who can't for the life of them figure out why I'm taking pictures of an ugly, smelly factory smokestack, or a dirty, loud, diesel (and perhaps urine)–scented empty street.
Most of the people I met in Elyria-Swansea were cordial. Some were, understandably, mildly suspicious of the presence of a stranger shooting pictures in their neighborhood. Generally they warmed up after a simple explanation that I enjoy urban/ industrial photography. Some took a genuine interest in my work, and were readily convinced to see and appreciate the beauty of sunlight angling down to describe the textured wall of an abandoned building, or the curl of steam against the deep blue Colorado sky.
Enjoy my pictorial interpretation of this essential Denver neighborhood, a community that is currently undergoing major changes. My photos show the physical/visual world of Elyria-Swansea. The real heart of this place is the people who live here. Check out the links below for more of their stories. Please click the Leave a Comment link at the top, or the Add Comment button below, to comment on this post or my pictures, to ask a question, or to share your own personal story about this unique Denver neighborhood.
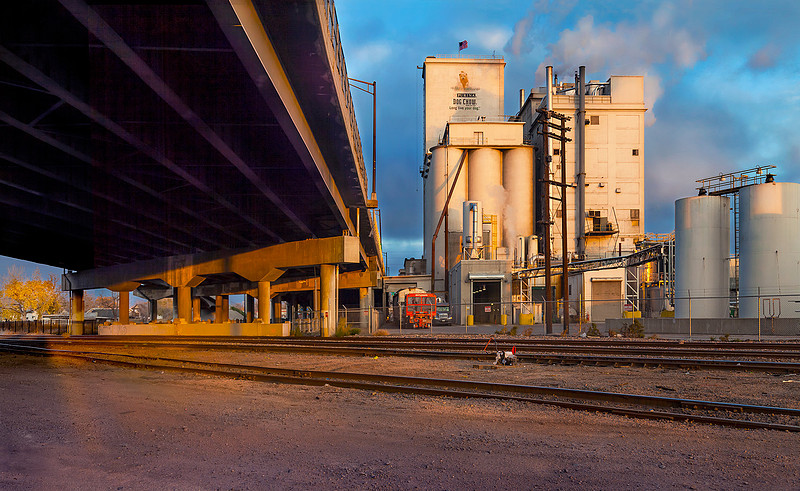 Evening SunlightCapturing late day "Alpenglow" just as effectively as a mountain peak, the widely visible Purina Factory stands at the intersection of the Union Pacific railroad mainline and an elevated stretch of I-70. Evening SunlightCapturing late day "Alpenglow" just as effectively as a mountain peak, the widely visible Purina Factory stands at the intersection of the Union Pacific railroad mainline and an elevated stretch of I-70.
More Pictures and Other Resources
To see more of my Elyria-Swansea images, click here, or on the photo above.
Below are links to a few selected resources for learning more about the Elyria-Swansea neighborhood of Denver:
-
History and background:
-
City of Denver neighborhood plan, I-70 expansion and improvement project, and its impact:
|
Archive
January
February
March
April
May
June
July
August
September
October
November
December
|
|
January
February
March
April
May
June
July
August
September
October
November
December
|
January
February
March
April
May
June
July
August
September
October
November
December
|
January
February
March
April
May
June
July
August
September
October
November
December
|
January
February
March
April
May
June
July
August
September
October
November
December
|
January
February
March
April
May
June
July
August
September
October
November
December
|
January
February
March
April
May
June
July
August
September
October
November
December
|
January
February
March
April
May
June
July
August
September
October
November
December
|
|